FitEyesDirection
Only in Wrap4D
FitEyesDirection automatically computes the pitch and yaw of the eye geometries by comparing the rendered eye geometries and the input image pixel by pixel
Inputs
- Left eye
GeometryLeft eye geometry, which needs to be rotated according to reference- Right eye
GeometryRight eye geometry, which needs to be rotated according to reference
Note
To connect, you first need to load the geometry of the eye, the center of rotation of which is located at the the point (0, 0, 0), the geometry must be directed along the Z axis. Our gallery already has a properly positioned geometry. Next, you need to arrange the eye geometries into eye sockets using transforms. The algorithm rotates the eyes around the center of rotation (point (0, 0, 0)), so if the geometry initially stands differently, the eyes will rotate incorrectly.
Tip
From our tests it follows that it is best to fit geometry with a flat iris. This geometry is already in our gallery
- Cameras
Camera(multiple) Undistorted cameras- Target Images
Images(multiple) Undistorted images, corresponding to input Cameras- Detections
FacialDetection(multiple) Undistorted detections, corresponding to input images and cameras. Needed to limit the area of the image that will be used in the fit
Tip
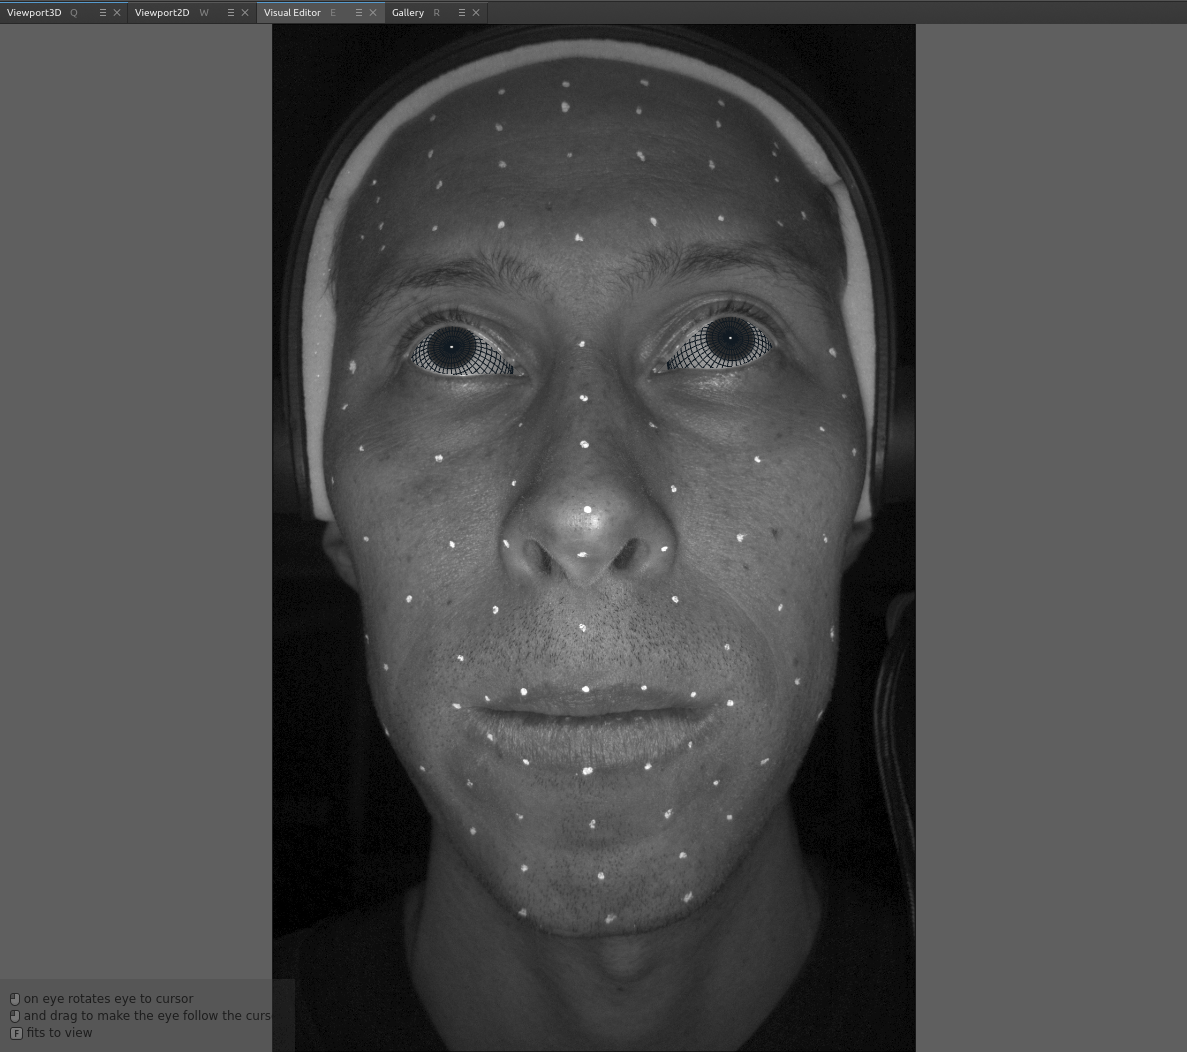
After successfully adding all the inputs, the visual editor will start working. If everything is connected correctly, then the eye geometries will be rendered in the correct position, as in the image below
Output
- Left eye
GeometryLeft eye geometry with result rotation transform, combined with previous geometry transformations- Right eye
GeometryRight eye geometry with result rotation transform, combined with previous geometry transformations
Tip
To get a centered eye transform, you need to apply all input transforms as inverted and in reverse order. The easiest way to do this is using a CopyTransform node. You need to copy transform from the node input as inverted and apply to FitEyesDirection node output. This transform will be needed in the InterpolateEyes node
Parameters
- Compute:
starts fitting process
- Auto-Compute:
if set, the node will be recomputed each time some parameter or input data is changed
- Visibility:
blends by mask renders of eyes with input images
- Prefit Type:
if set, regardless of the initial position of the eye, optimization will start from the center of the mask. Enabled by default, it is not recommended to disable unnecessarily
- Optimization Iterations:
number of optimization iterations. It takes a large value by default, but if a solution is found and the number of iterations has not reached the limit, then the optimization stops
- Downsampling Iterations:
number of outer iterations in which the image is reduced and the main optimization is performed. In tests, 3 and 4 downsampling iterations proved to be the most universal values
- Accuracy:
number from 1 to 10. Increasing the parameter increases the accuracy required to end a fit prematurely. In most tests, with a parameter value of 4, it was quite sufficient, but in some cases, you may need to increase the value of the parameter
- Image Fitting Trust Threshold:
number representing how much we trust the input data. It means that if the difference between the render and the image in a pixel is greater than the threshold, then this will not be considered an error. By default, the threshold is 50, but can take a value from 0 to 255. A small threshold value allows you to ignore glare in the eyes and other noise. In the absence of glare and noise, the parameter value can be increased
- View Distance Consistency:
weight that affects how much the result of the fit will be affected by the mutual rotation of the eyes. If there is no need for an option, the weight is set to 0, otherwise the weight is made small (for example 0.001)
- Image Width:
Internally, the algorithm will reduce the size of the image to speed up the algorithm. Excessive reduction of the image size can degrade the quality of the fit. The default value is 1200, which was used for all our tests
- Reducing Mask on X(Y) Size:
reduction of the mask size by coordinates. Used to remove eyelashes and eyelids from the fit area, but it is important to try not to lose information about the eyes
Troubleshooting
Too big mask problem
Poor eye fit is possible when given too much area to optimize. To solve the problem, you need to increase the values of the parameters Reducing mask on X size and Reducing mask on Y size. The result of changing these parameters can be seen in the visual editor. On the example we changed params 3->10 and 3->8 respectively
Fitting with reduced mask:
Low accuracy problem
Decreasing the Accuracy parameter allows you to noticeably speed up the eyes fitting, but if you overdo it, the optimization will stop too early, and the result of the fit will not match the image. It is also possible that the initial value of parameter (4) may not be enough. You will notice this if the result of the node is close to the desired result, but not completely
Jitter
If you notice jitter when viewing sequences, then the problem may be in which texture you are using for optimization. If the texture iris radius is much larger or smaller, then the algorithm can turn the eye differently from frame to frame, and it will be considered that it did everything correctly. You can check the coincidence of radii using nodes Render and MergeImage or in a visual editor of FitEyesDirection node.
Below is an example of a texture with a too small radius and also with a suitable radius