Getting Started
Let’s have a look at a typical Blendshape Rig fitting to 4D data pipeline.
Load Blendshape Rig
First of all, you need to load Blendshape Rig into Wrap4D. You can load Blendshape Rig using LoadBlendRig node. The node loads a neutral geometry, blendshapes, relaxation masks, and a rig config file. In order to load the Blendshape Rig, rename your heroshapes, corrective blendshapes, and relaxation masks according to Naming.
Tip
Initially, in Blendshape Rig every heroshape has its own weight, called control value. Changing every control value changes a Blendshape Rig result geometry. You can merge all heroshapes control values with suffixes L and R into one control value with with a range from 0 to 1, for example: JawOpen_L and JawOpen_R merge into JawOpen. You need to create a JSON file:
{
    "version": 2
    "SynchronizedSuffixes": [],
    "MirrorSuffixes": []
}
And modify it like this:
{
    "version": 2
    "SynchronizedSuffixes": [
    {
        "Suffixes":["L", "R"],
        "Blendshapes":["JawOpen"]
    }
    ],
    "MirrorSuffixes": []
}
You can specify any number of heroshape names. It allows you to block the separated activation of control values, that must be activated together, for example JawOpen_L and JawOpen_R. You can read about it in Mirror Suffixes.
Paste this JSON file into the field Rig Config.
Tip
If in your Blendshape Rig allows merge all pairs heroshapes with suffixes Left and Right into one control value with a range from -1 to 1 with suffix Side, for example: Jaw_Left and Jaw_Right merge into Jaw_Side where Jaw_Left is -1, Jaw_Right is 1. You need to create a JSON file:
{
    "version": 2
    "SynchronizedSuffixes": [],
    "MirrorSuffixes": []
}
And modify it like this:
{
    "version": 2
    "SynchronizedSuffixes": [],
    "MirrorSuffixes": [
    {
        "FirstSuffix": "Left",
        "SecondSuffix": "Right",
        "ResultSuffix": "Side"
    }
    ]
}
Similarly for other suffixes. It allows you to block the simultaneous activation of control values, that can not be activated at the same time, for example Jaw_Left and Jaw_Right. You can read about it in Synchronized Suffixes.
The Blendshape Rig is loaded and ready for operation.
Blendshape Rig Fitting
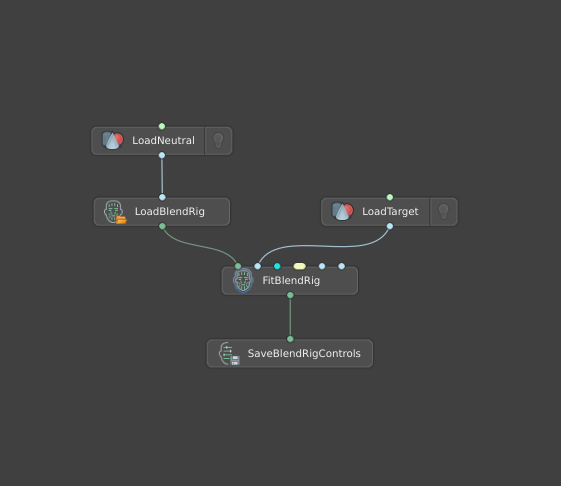
Create FitBlendRig node.
Connect the Blendshape Rig and Target Geometry to it.
Turn off Fit Eyes Using Transform.
Click Compute button.
Fit Blenshape Rig is ready.
Create SaveBlendRigControls node, specify the desired path and click the Compute button.

Tip
To improve the Fit Blendshape Rig you can check Fit Eyes Using Transform parameter. You can define Max Rotation Angles for each eye if you know them, otherwise leave them as default. To copy the eyes and lips closing, use the PointPairs. More about use in FitBlendRig.
Blendshape Rig Modification
Here is an example of how you can modify a Blendshape Rig based on a SplitBlendRig node.
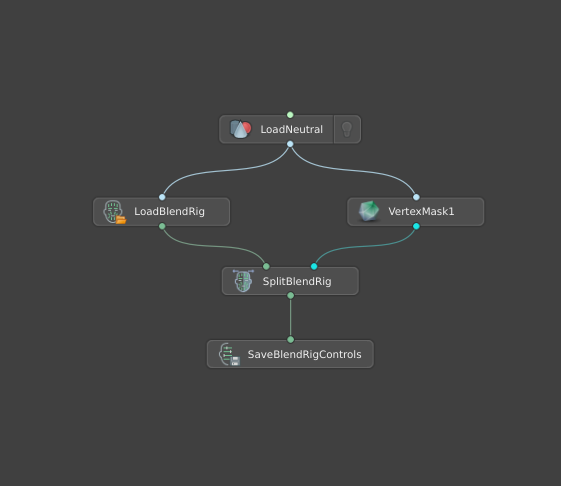
Load the Blendshape Rig as described above.
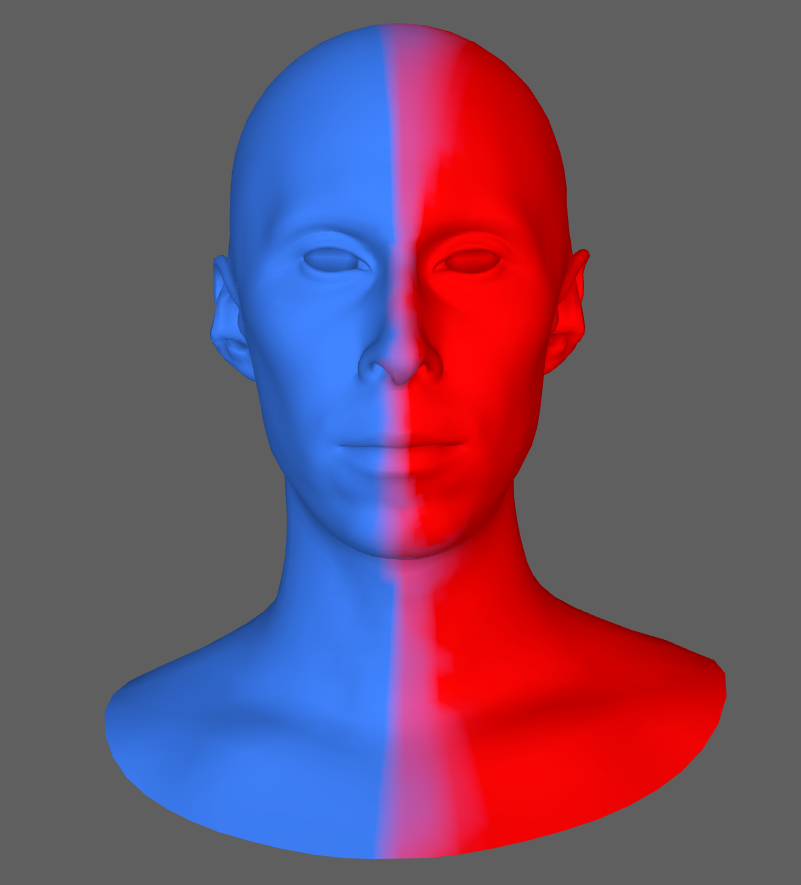
Create Vertex Mask for split, for example for left-right split.

Create SplitBlendRig node.
Connect the Blendshape Rig and Vertex Mask to it and specify the Merge Suffixes.
Create SaveBlendRig node and save new control values in JSON.

Control Values Visualization
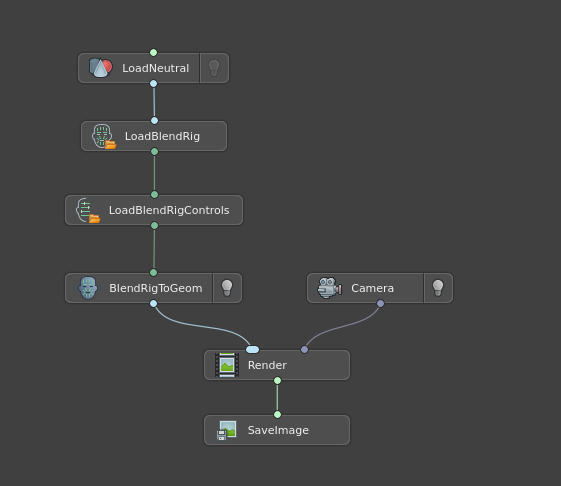
Load the Blendshape Rig as described above.
Load Blendshape Rig control values by LoadBlendRigControls node.
Create BlendRigToGeom node. Connect the Blendshape Rig to it.
Create Render node. Connect the result geometry and Camera node result to it.
Create SaveImage node. Connect the result image, specify the desired path and click Compute button.
